- Add the Apply Stamp activity to your workflow definition by dragging it from the Toolbox Pane and dropping it in the Designer Pane.
- Select the activity in the Designer Pane.
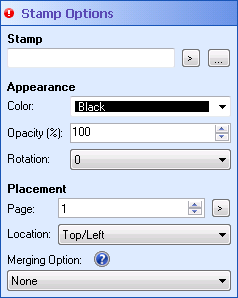
- Under Stamp Options in the Properties Pane, configure your stamp.
- Type the name of the public stamp you want to apply, or click the Browse button
 to
to  browse for a stamp. Alternatively, click the Token button (right arrow)
  to use tokens to specify the stamp's name.
Note: This activity can only use public stamps that do not include Laserfiche tokens (e.g., %(Parent)). You cannot use custom stamps that include one or more tokens nor create a custom stamp with this activity. More information. You also cannot use private stamps, even if the stamps are owned by the Workflow User.
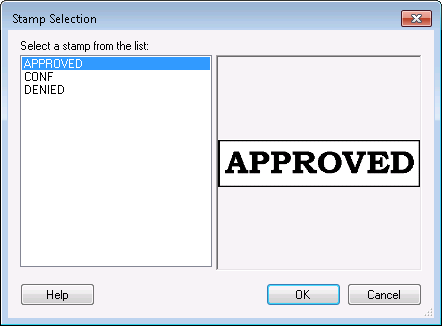
- If you click the Browse button, you can choose a public stamp from the Stamp Selection dialog box. When you select a stamp in the dialog box, a preview of the stamp will appear in the right half of the dialog box. After making your selection, click OK.
Note: If no stamps appear in this dialog box, there are no public stamps in your repository. See the Client online help files for information about adding public image or text stamps to your repository.
Note: Only custom public stamps without tokens will appear in this list.
- In the Appearance section, configure the following options:
- Color: Select the color for the stamp from the drop-down menu. To select a custom color click More, then click Define Custom Colors and use the color picker tool or input a color using an RGB color code. Once a color is selected, click Add to Custom Colors. Click the custom color in the Custom Color group box and click OK.
- Opacity (%): Select how opaque the stamp will be. If you select 100% opacity, the stamp will be completely opaque: you will not be able to see the document behind the stamp. If you select 1% opacity, the stamp will be almost completely transparent/invisible. Type an opacity percentage between 1 and 100, or use the scroll box (up-and-down arrows)
 to select a percentage.
- Rotation (degrees): Select how many degrees (if any) the stamp will be rotated when it is added to the page. Use the drop-down menu to choose 0 degrees, 90 degrees, 180 degrees, or 270 degrees.
- In the Placement section, configure the following options:
- Page: Configure which page the stamp will be added to by typing a number, using the scroll box (up-and-down arrows) , or clicking the Token button (right arrow) to use tokens.
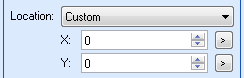
- Location: Select the location on the page where the stamp will appear.
- Merging Options: If you have more than one stamp in the same location, you can choose how the stamps will be displayed. Under Merging Option, use the drop-down menu to select a display style.
Note: Stamps are considered to have the same location if they have the same upper-left coordinate, if their centers are close to each other, or if one stamp's borders are completely inside another stamp.
Note: Stamps will only be merged if they have the same protection level.
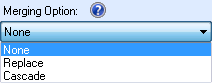
- None: Places the stamp box on top of the existing stamp.
- Replace: Replaces the existing stamp with the new stamp.
- Cascade: Places the new stamp slightly offset from the existing stamp. Show me what this looks like.